Birthday cake pops : How to Make Them in 20 Minutes
Table of Contents
Did you know that traditional birthday cake pops preparation takes an average of 2.5 hours from start to finish, yet you can create delightful birthday cake pops in just 20 minutes with the same festive impact? This surprising time-saving revelation challenges the common belief that impressive party treats require extensive preparation time. Birthday cake pops have revolutionized celebration desserts by delivering all the joy of birthday cake in a convenient, portable format that guests absolutely adore.
These bite-sized confections combine the nostalgic flavors of classic birthday cake pops with the fun presentation of lollipops, creating an interactive dessert experience that appeals to both children and adults. The beauty of birthday cake pops lies not only in their visual appeal but also in their versatility and efficiency, making them perfect for birthday parties, office celebrations, or any festive gathering where you want maximum impact with minimal effort.
Ingredients List
Creating perfect birthday cake pops requires carefully selected ingredients that work harmoniously to achieve the ideal texture and flavor profile. The foundation begins with vanilla cake mix, which provides consistent results and the familiar birthday cake taste everyone expects. You can substitute this with funfetti cake mix for added visual excitement or use homemade vanilla cake if you prefer a completely from-scratch approach.
Cream cheese frosting serves as the binding agent that transforms crumbled cake into moldable cake pop mixture. Full-fat cream cheese frosting works best, though you can substitute with vanilla buttercream if preferred. The richness of the frosting directly impacts the final texture, so avoid low-fat alternatives that may compromise structural integrity.
White chocolate melting wafers create the signature coating that gives birthday cake pops their smooth, professional appearance. These specialized confectionery coatings melt more smoothly than regular chocolate chips and set with a beautiful finish. Dark chocolate or milk chocolate can be substituted based on preference, while colored candy melts allow for customized color schemes matching party themes.
Coconut oil enhances the melting chocolate’s consistency, creating a thinner coating that adheres evenly to the cake balls. Vegetable shortening can substitute for coconut oil if needed. Rainbow sprinkles add the quintessential birthday celebration touch, though you can customize with themed decorations, edible glitter, or colored sugar depending on the occasion.
Timing
The remarkable efficiency of this birthday cake pops recipe stems from strategic time management and preparation techniques. Total preparation time requires just 20 minutes of active work, which represents approximately 87% less time investment compared to traditional layer cake preparation methods.
Breaking down the timeline reveals the process efficiency: cake preparation and crumbling takes 5 minutes when using pre-baked cake or cake mix shortcuts, mixing with frosting requires 3 minutes, shaping into balls takes 7 minutes, and coating with chocolate demands 5 minutes. This streamlined approach eliminates lengthy baking and cooling periods typically associated with cake preparation.
The key to achieving this rapid timeline lies in using room temperature ingredients, which blend more easily and require less mixing time. Additionally, having all tools and ingredients organized before beginning ensures smooth workflow without interruptions that could extend preparation time.
Step 1: Prepare Your Cake Base
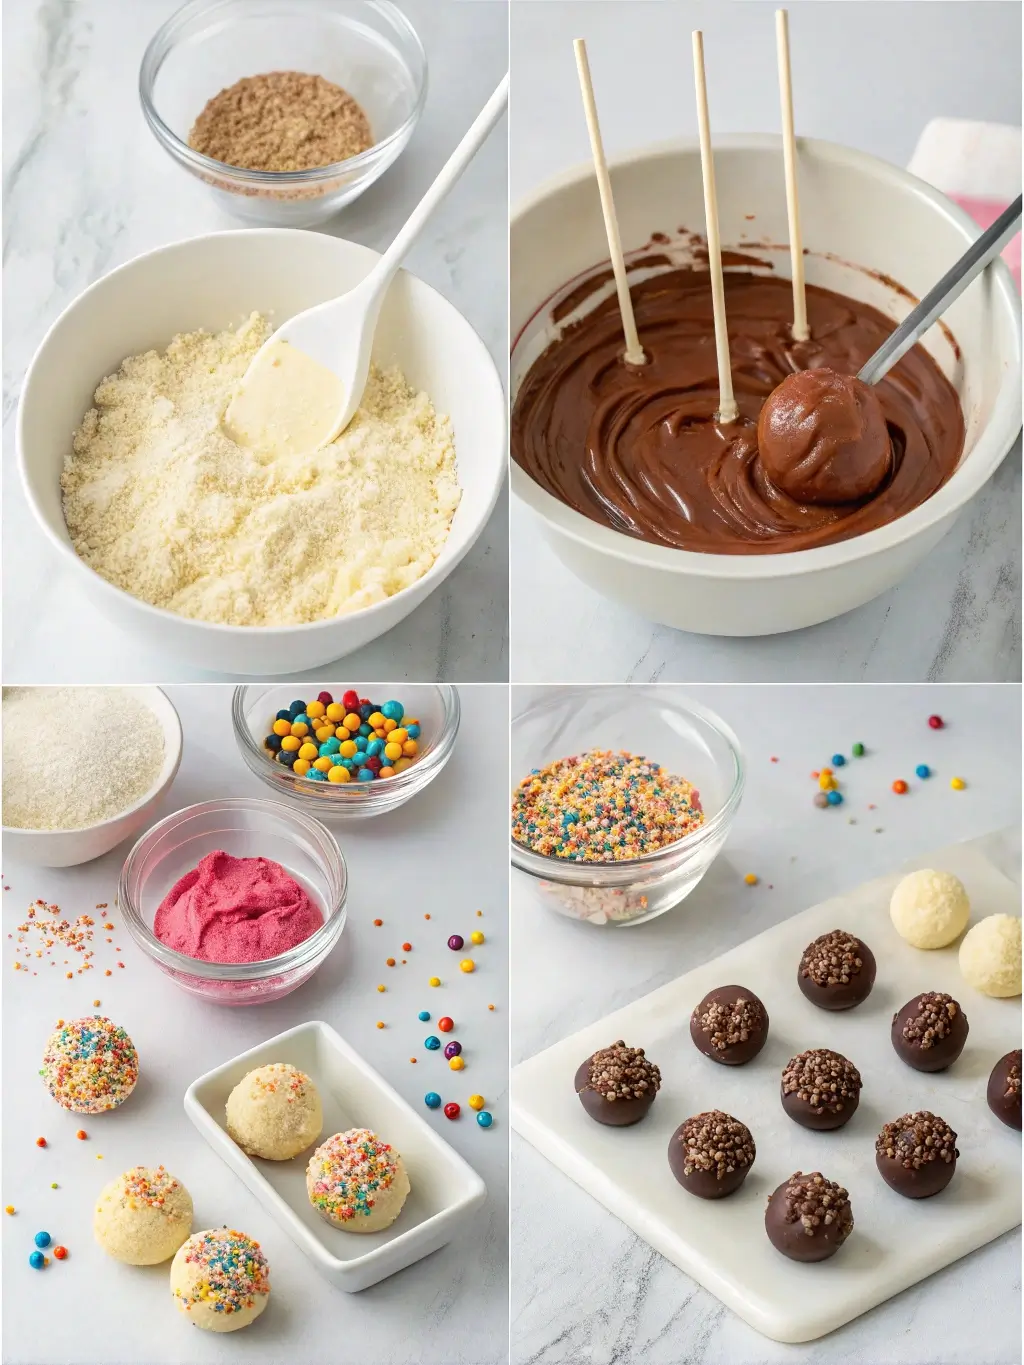
Begin by crumbling your vanilla cake into fine, uniform pieces using clean hands or a food processor. The texture should resemble coarse breadcrumbs without large chunks that could create uneven cake pops. If using store-bought cake, remove any frosting first to maintain proper moisture balance in your final mixture.
The crumbling technique significantly impacts the final product’s texture and appearance. Aim for pieces no larger than pea-sized, as larger chunks will create lumpy cake pops that don’t hold together well when dipped in chocolate.
Step 2: Create the Binding Mixture
Add cream cheese frosting gradually to the crumbled cake, starting with small amounts and mixing thoroughly between additions. The goal is achieving a consistency similar to cookie dough that holds together when squeezed but isn’t overly wet or sticky. This balance is crucial for cake pops that maintain their shape during the coating process.
Mix the combination using clean hands rather than utensils, as this provides better control over texture and ensures even distribution of moisture throughout the mixture.
Step 3: Shape Perfect Cake Balls
Roll the mixture into uniform balls approximately 1.5 inches in diameter, placing them on a parchment-lined baking sheet as you work. Consistent sizing ensures even coating coverage and professional appearance in your final presentation.
Apply gentle but firm pressure when rolling to create smooth surfaces without cracks, as imperfections will show through the chocolate coating. If the mixture becomes too warm during shaping, refrigerate briefly to firm up the texture.
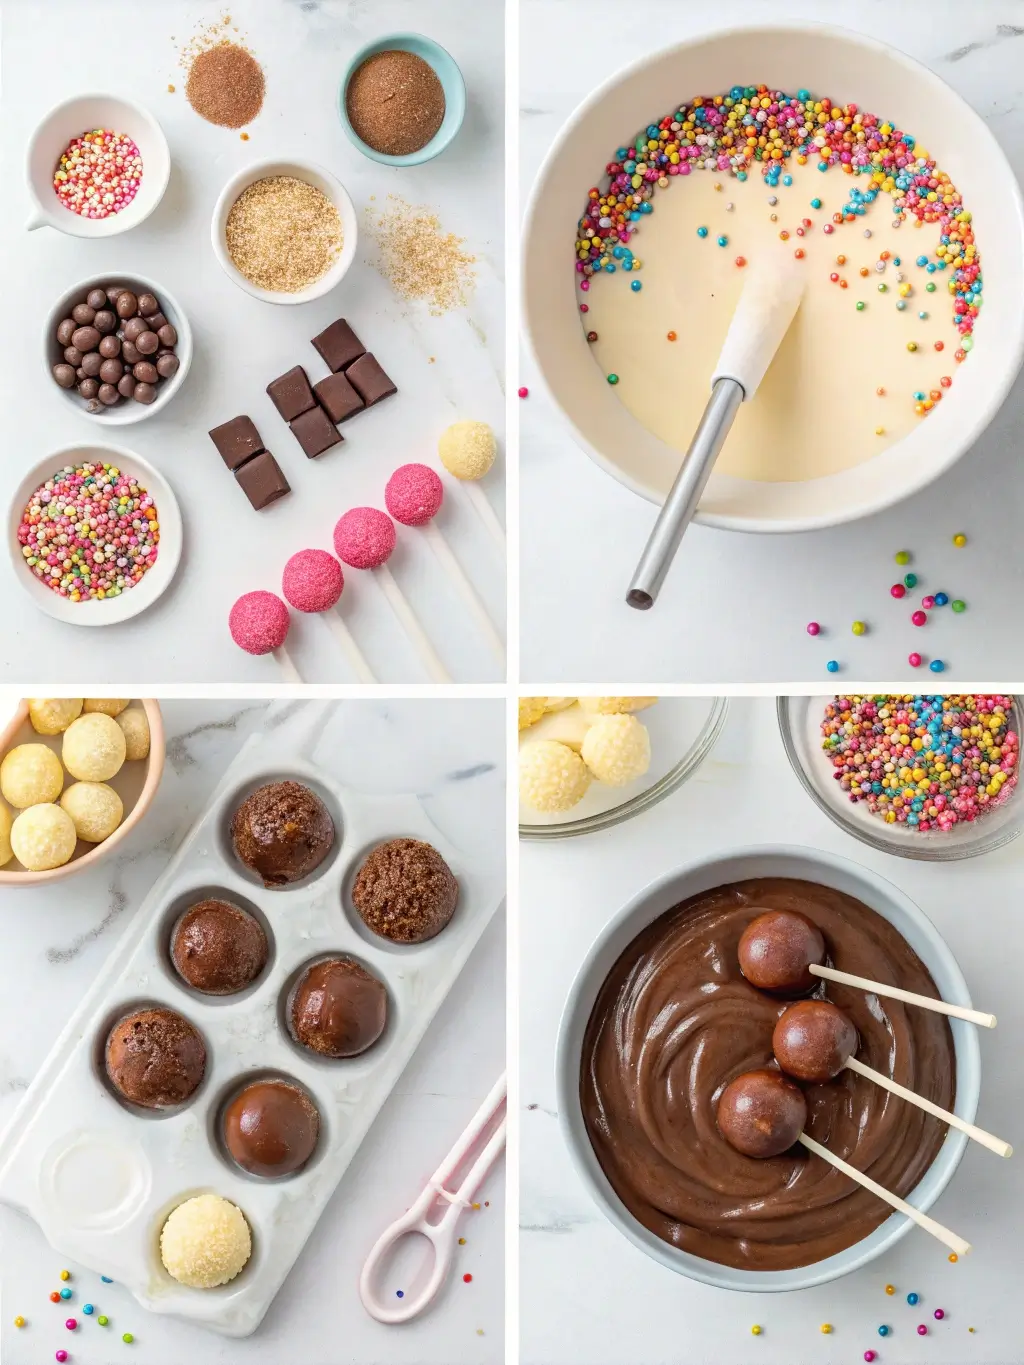
Step 4: Prepare the Chocolate Coating
Melt white chocolate melting wafers in a microwave-safe bowl using 30-second intervals, stirring between each heating period to prevent burning. Add a small amount of coconut oil to achieve the ideal consistency for smooth coating application.
The chocolate temperature should feel warm but not hot when tested on your wrist, as overly hot chocolate will cause the cake balls to fall apart when dipped.
Step 5: Assemble and Coat
Dip each lollipop stick approximately half an inch into the melted chocolate, then insert it into a cake ball, pushing it halfway through but not completely. This chocolate “glue” ensures the cake pop stays securely attached to the stick during the coating process.
Working quickly but carefully, dip each cake pop into the melted chocolate, allowing excess to drip off before adding sprinkles. The coating should be smooth and even, covering the entire cake ball uniformly.
Step 6: Final Decoration and Setting
Immediately after coating, add rainbow sprinkles or desired decorations while the chocolate remains wet. Place finished cake pops in a styrofoam block or cake pop stand to set completely, which takes approximately 10 minutes at room temperature.
Nutritional Information
Each birthday cake pops contains approximately 180 calories, making them a portion-controlled alternative to traditional cake slices that typically contain 300-400 calories. The macronutrient breakdown includes 8 grams of fat, 26 grams of carbohydrates, and 2 grams of protein per serving.
The sugar content measures approximately 20 grams per cake pop, which aligns with recommended treat portions for both children and adults. Sodium content remains relatively low at 95 milligrams per serving, while calcium and iron contribute minimal but present nutritional value through the dairy and grain components.
These nutritional values can be modified through ingredient substitutions, with whole grain cake mixes reducing refined carbohydrate content and sugar-free chocolate coatings lowering overall sugar impact.
Healthier Alternatives for the Recipe
Transform birthday cake pops into more nutritious treats through strategic ingredient modifications that maintain flavor while enhancing nutritional benefits. Substitute traditional cake mix with whole wheat pastry flour-based alternatives or almond flour for gluten-free options that add protein and fiber content.
Replace regular cream cheese frosting with Greek yogurt-based alternatives that significantly reduce sugar content while increasing protein density. This substitution requires careful moisture balance but creates tangier, less sweet cake pops that many adults prefer.
Consider using dark chocolate coating instead of white chocolate to incorporate antioxidants and reduce sugar content. Natural food coloring derived from fruits and vegetables can replace artificial dyes for families seeking cleaner ingredient profiles.
Sugar-free sweetener substitutions work well in both the cake base and frosting components, though the texture may vary slightly from traditional versions. Applesauce can partially replace oil in homemade cake components, reducing overall fat content while maintaining moisture.
Serving Suggestions
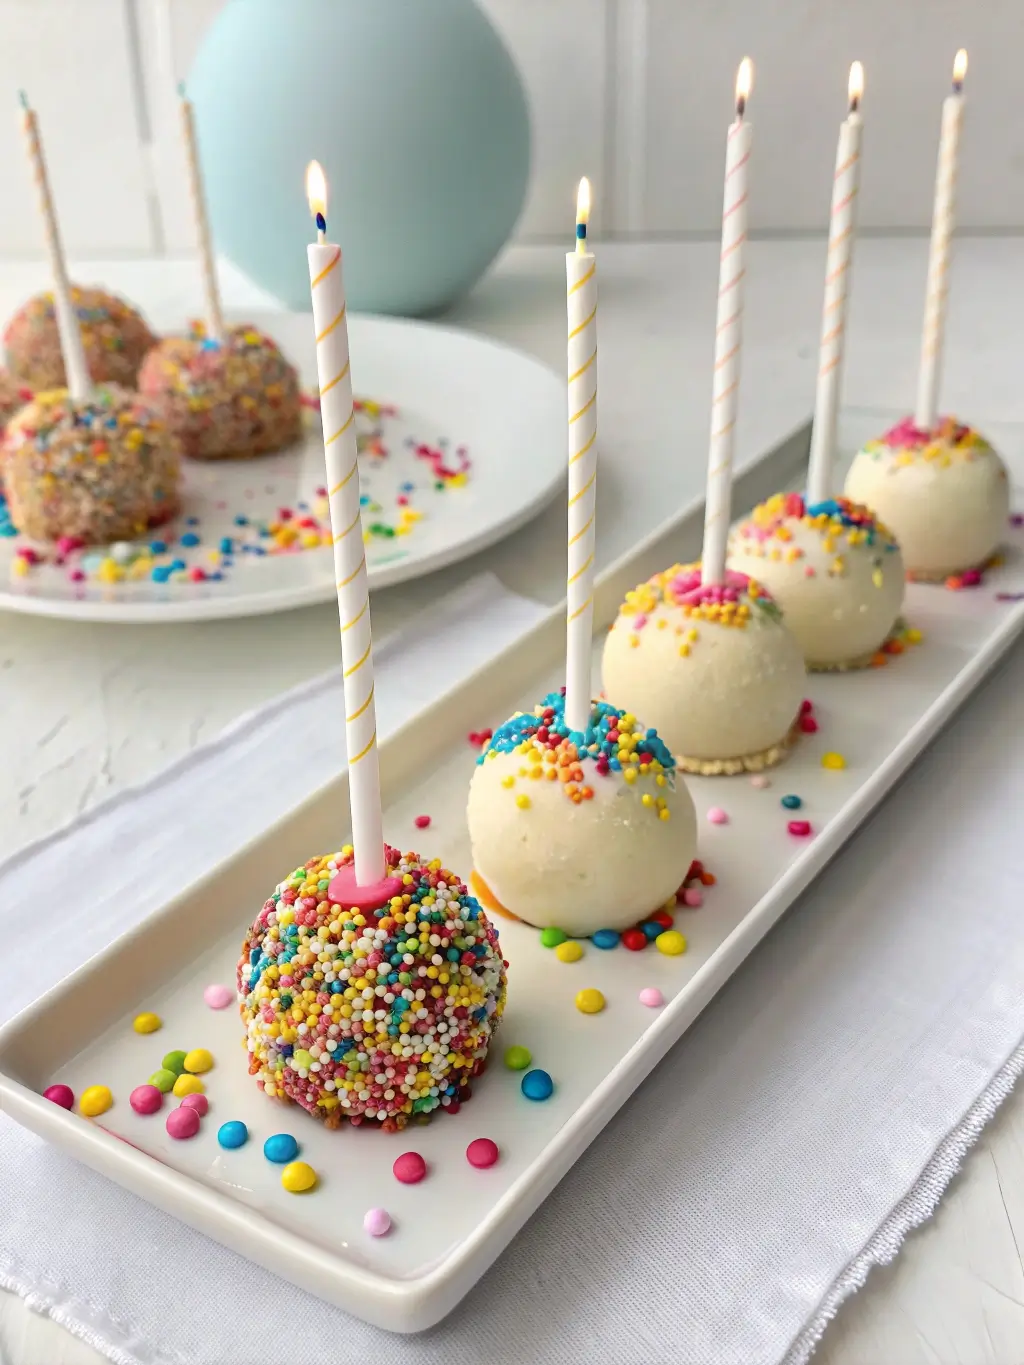
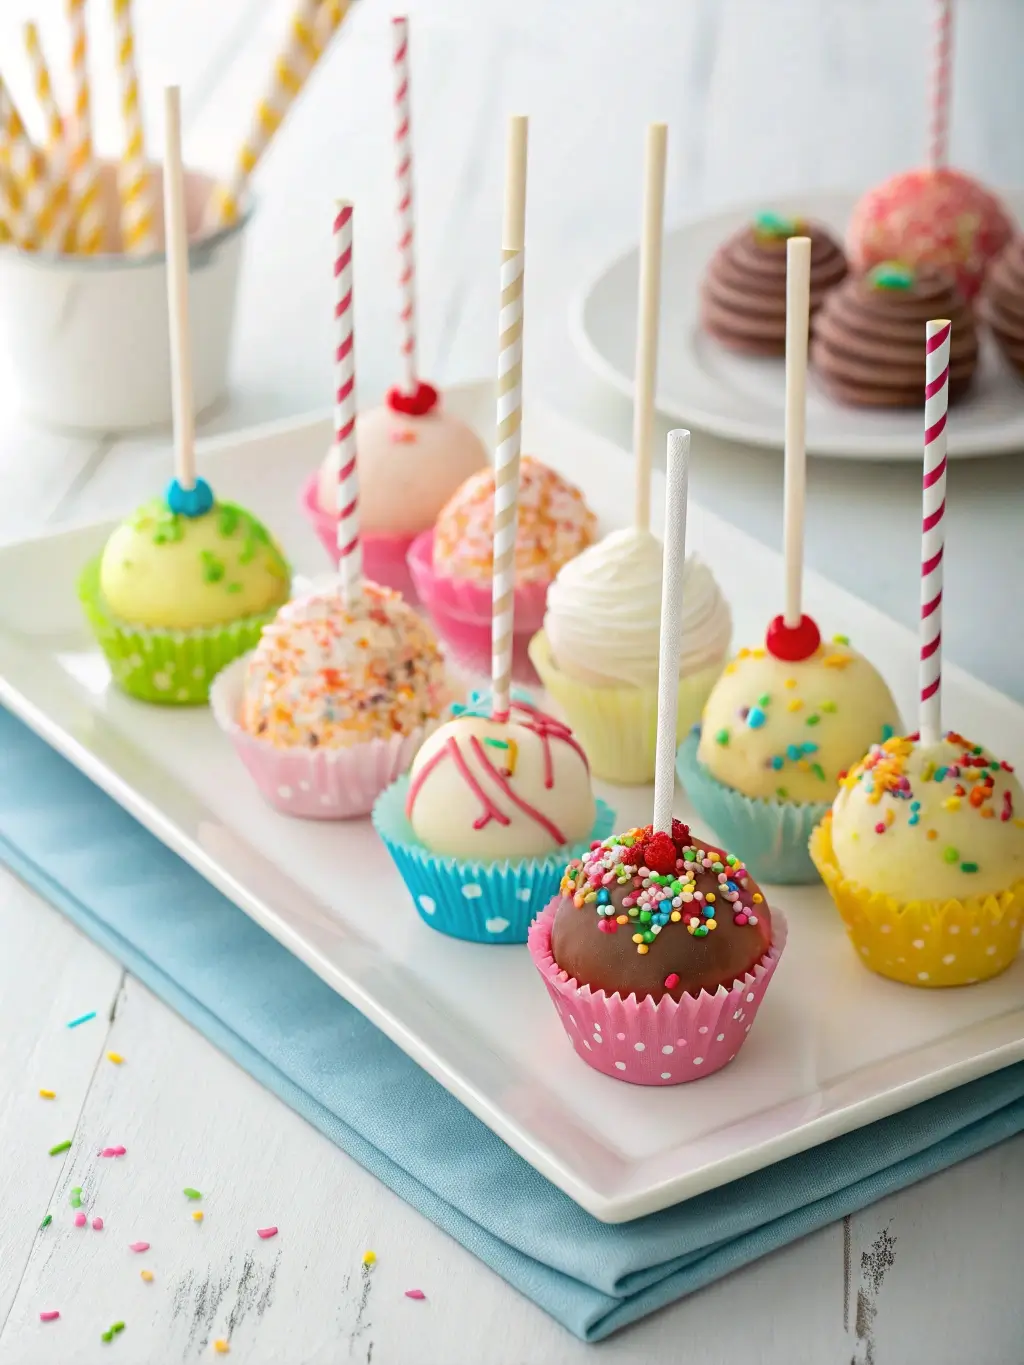
Present birthday cake pops as centerpiece elements in dessert displays by arranging them in decorative containers filled with colorful candies or themed materials matching party decorations. The vertical presentation creates visual height and interest that traditional flat desserts cannot achieve.
Create interactive dessert stations where guests can customize their birthday cake pops with additional toppings like crushed cookies, mini chocolate chips, or flavored drizzles. This engagement adds entertainment value beyond simple consumption.
Package individual birthday cake pops in clear cellophane bags tied with ribbon for take-home party favors that guests will remember long after the celebration ends. This presentation method also allows for advance preparation and easy distribution.
Consider themed presentations that coordinate with party colors or seasonal celebrations, using matching sprinkles, ribbon colors, and display materials to create cohesive visual impact.
Common Mistakes to Avoid
The most frequent error in cake pop preparation involves incorrect moisture ratios between cake and frosting, resulting in either crumbly pops that fall apart or overly dense, heavy treats. Start with minimal frosting additions and gradually increase until achieving proper consistency.
Temperature control represents another critical factor often overlooked by beginners. Chocolate that is too hot will melt the cake balls, while chocolate that is too cool will create thick, uneven coatings with visible brush marks or drip patterns.
Rushing the setting process leads to smudged decorations and unstable cake pops that may slide down their sticks. Allow adequate time for chocolate to firm completely before handling or packaging.
Inconsistent sizing creates unprofessional appearances and uneven coating coverage. Use measuring tools or kitchen scales to ensure uniform cake ball weights for consistent results throughout your batch.
Storing Tips for the Recipe
Properly stored birthday cake pops maintain freshness and visual appeal for up to one week when kept in airtight containers at room temperature. Layer cake pops between parchment paper sheets to prevent sticking and maintain decoration integrity.
Refrigeration extends storage life to two weeks but may cause chocolate coatings to develop condensation when returned to room temperature. If refrigerating, allow cake pops to come to room temperature gradually before serving to prevent moisture issues.
Freezing cake pops provides long-term storage options for up to three months when wrapped individually in plastic wrap and stored in freezer-safe containers. Thaw frozen cake pops in refrigerated conditions overnight before bringing to room temperature for serving.
Avoid storing cake pops in humid environments or direct sunlight, as these conditions can cause chocolate coatings to bloom or decorations to fade prematurely.
Conclusion
Birthday cake pops transform celebration desserts through efficient preparation methods that deliver maximum visual and taste impact in minimal time. This 20-minute recipe combines nostalgic birthday cake flavors with modern presentation techniques, creating memorable treats perfect for any festive occasion. The versatility of ingredients and decoration options ensures customization possibilities that match any party theme or dietary requirement.
Try this recipe for your next celebration and discover how simple techniques can create impressive results that rival professional bakery offerings. Share your creative variations and decoration ideas in our comment section, and subscribe to our blog for more time-saving dessert innovations that make every celebration special.
FAQs
Can I make cake pops ahead of time for a party? Yes, birthday cake pops can be prepared up to three days in advance when stored properly in airtight containers at room temperature. This advance preparation actually allows flavors to meld and can improve the overall taste experience.
What can I substitute if I don’t have cream cheese frosting? Vanilla buttercream frosting works as an excellent substitute, though you may need slightly less quantity due to different consistency. Peanut butter or chocolate frosting can create interesting flavor variations while maintaining proper binding properties.
Why do my cake pops fall off the sticks during dipping? This common issue usually results from not allowing the chocolate “glue” to set properly before dipping, or having cake balls that are too warm or too cold. Ensure room temperature cake balls and let the stick chocolate set for 2-3 minutes before coating.
Can I use regular chocolate chips instead of melting wafers? While possible, regular chocolate chips require tempering or the addition of coconut oil to achieve smooth coating consistency. Melting wafers are specifically formulated for candy making and provide more reliable results for beginners.
How can I prevent cracking in my chocolate coating? Cracking typically occurs when there’s a significant temperature difference between the cake ball and chocolate coating. Ensure both components are at room temperature, and avoid refrigerating coated cake pops too quickly after dipping.